Hey folks,
In this quick article, you are going to learn how to deploy Exchange 2016 on Windows Server 2012R2.
before the long article let’s speak a little bit about what are the differences between Exchange 2016 to Exchange 2013 and what benefits we get:
Mailbox role and CAS role combined with Mailbox role.
RPC over HTTP replaced with MAPI OVER HTTP.
Hybrid configuration Wizard upgraded to HCW -office 365 application hybrid support.
Some new conditions and actions added to Exchange 2016.
The eDiscovery upgraded with Public folder support and in-place hold for in place eDisconvery + Compliance Search.
And Microsft improved some enhanced the search which is faster, better relibility with quick failovers,
Requirements according to TechNet:
Processor:
x64 architecture-based computer with Intel processor that supports Intel 64 architecture (formerly known as Intel EM64T)
AMD processor that supports the AMD64 platform
Intel Itanium IA64 processors not supported
Memory:
Varies depending on Exchange roles that are installed:
Mailbox 8GB minimum
Edge Transport 4GB minimum
Disk space:
At least 30 GB on the drive on which you install Exchange
An additional 500 MB of available disk space for each Unified Messaging (UM) language pack that you plan to install
200 MB of available disk space on the system drive
A hard disk that stores the message queue database on with at least 500 MB of free space.
Paging file size and storage:
The page file size minimum and maximum must be set to physical RAM plus 10 MB, to a maximum size of 32778MB if you’re using more than 32GB of RAM.
allocation unit sizes.64 KB for both .edb and log file volumes.
Use GPT partitions.
I have two machines:
Active Directory (2012R2) Forest Level 2012R2 | Windows Server 2012 R2 for Exchange 2016
We have to start with the prerequisites on the Exchange server.
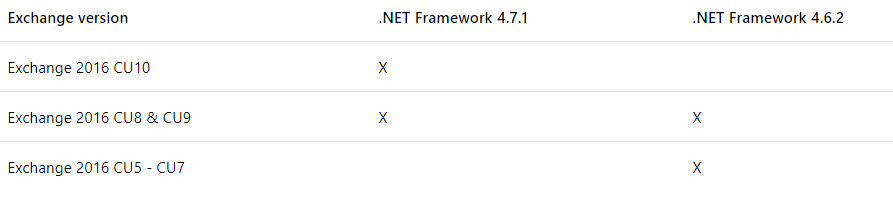
Download & Install Framework 4.7.1 – Note if you install CU10 Follow this:
Download the Visual C++ Redistributable Package for Visual Studio 2013
Open Powershell on the new server and run:
1.Install-WindowsFeature RSAT-ADDS
2: Powershell command:
Install-WindowsFeature AS-HTTP-Activation, Desktop-Experience, NET-Framework-45-Features, RPC-over-HTTP-proxy, RSAT-Clustering, RSAT-Clustering-CmdInterface, RSAT-Clustering-Mgmt, RSAT-Clustering-PowerShell, Web-Mgmt-Console, WAS-Process-Model, Web-Asp-Net45, Web-Basic-Auth, Web-Client-Auth, Web-Digest-Auth, Web-Dir-Browsing, Web-Dyn-Compression, Web-Http-Errors, Web-Http-Logging, Web-Http-Redirect, Web-Http-Tracing, Web-ISAPI-Ext, Web-ISAPI-Filter, Web-Lgcy-Mgmt-Console, Web-Metabase, Web-Mgmt-Console, Web-Mgmt-Service, Web-Net-Ext45, Web-Request-Monitor, Web-Server, Web-Stat-Compression, Web-Static-Content, Web-Windows-Auth, Web-WMI, Windows-Identity-FoundationPerform restart:

Download the “Unified Communications Managed API 4.0 Runtime”:
And install it:

Great, the first step is to start with the preparation of the Domain Controller:
Mount the Exchange ISO on the Domain Controller and extract the content to the folder, after that open from the DC the CMD and change directory to the Exchange folder you have extracted:
Setup.exe /PrepareSchema /IAcceptExchangeServerLicenseTerms


2. Setup.exe /PrepareAD /OrganizationName:”<organization name>” /IAcceptExchangeServerLicenseTerms

3. Setup.exe /PrepareAllDomains /IAcceptExchangeServerLicenseTerms

Once we finish with the preparation, we have to start with Exchange installation process, go back to the Exchange Server and run the installation.


It means that “MailBox Role” includes the all other roles.
Check the Mailbox Role, and the Automatically install Windows


Here is the Server:

Hope it was useful for you guys, please consider the preparation and designed as much as you can.
Thanks.